How to Set Up DKIM for Microsoft Office 365?

Why should you consider configuring an Office 365 DKIM setup? The answer is simple, Microsoft recommends a DKIM record to sign your outbound emails digitally so that they don't get tampered with or accessed by threat actors in the process of being transferred. Enabling O365 DKIM is an essential step to ensure your email's security.
Creating Office 365 DKIM keys on the Microsoft 365 Defender portal
Note: Previously, the DKIM office 365 configuration was carried out using the O365 Exchange Online portal. However, with improvements that were underway pertaining to Microsoft’s security processes, the DKIM configuration process has been up and moved to the Microsoft 365 Defender portal.
Today we are going to discuss how you can enable DKIM Office 365 by using the new and improved Office 365 Defender. Follow the instructions given below:
- Login to your Defender account. You can use the link provided above.
- On the portal, navigate and click on Policies & rules under Email & Collaboration
- On the Policies & rules page, select Threat policies

- Now select DomainKeys Identified Mail(DKIM) to open the DKIM page
- On the DKIM page, select the domain you want to enable DKIM for (this is the domain you use to send outbound messages)

- You can now toggle the Enable button to start the activation process for DKIM. A dialogue box will appear which may contain the following status:
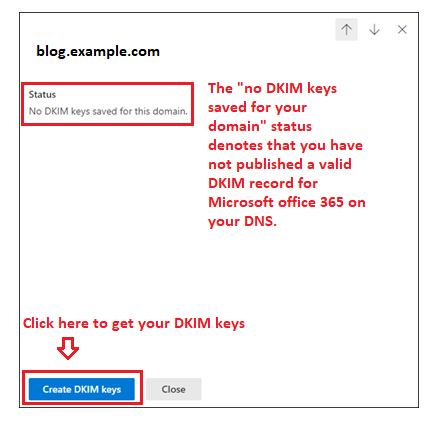
This isn’t something you should worry about. Simply click on the Create DKIM keys button to view your keys.
- A pop-up will now display your DKIM CNAME records
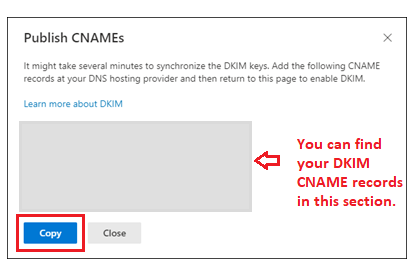
Click on the blue “Copy” button to copy records to your clipboard
Publishing your Office 365 DKIM CNAME records:
- Login to your DNS provider’s management console as the admin
- Navigate to the DNS records section
- Create new CNAME records (Record type: CNAME)
- Paste the copied hostnames and values, as provided on the Defender portal
- Keep TTL as 3600
- Save changes to your record and wait for 24-48 hours for your DNS to process these changes
Note: The process for publishing DNS records varies depending on which DNS hosting provider you use. The time it takes to activate the records also depends on the same.
Enabling the Microsoft 365 DKIM keys on your Defender account
After you are done publishing the records on your DNS, head back to the DKIM page on your Defender portal and toggle the “Enable” option.

DKIM couldn’t be enabled: CNAME records were not found
If an error persists and DKIM couldn’t be enabled for your domain on Microsoft’s Defender portal, follow these steps:
- Lookup your published DKIM record using our DKIM record lookup tool to see if it is valid and error-free
- Your DNS might be taking some time to save changes. Wait for at least 48 hours before verifying your setup.
- Cross-check your DKIM record’s syntax to ensure there are no inconsistencies like redundant spaces or special characters
- Get in touch with your DNS hosting provider to discuss the issue
- Get in touch with Microsoft’s support team to seek advice on the same
How to disable DKIM for Office 365?
You can disable DKIM for Office 365 with a single click on the Defender portal.
Simply head to Email & collaboration > Policies & rules > Threat policies > DomainKeys Identified Mail(DKIM)
On the DKIM page toggle the “Enable” button to disable the protocol.
Note: DKIM verification can help you better authenticate messages during special cases like email forwarding where SPF may fail. Keeping DKIM enabled for your domains is considered a good email practice and is highly recommended by Microsoft.
 Standard Email Protocols: SMTP, POP3 & IMAP Free4 m
- What is Email Security? Free4 m
- Email Security Practices Free4 m
- Building an Email Security Compliance Model Free5 m
- Corporate Email Security Checklist Free3 m 30 s
- What is the difference between Inbound email security and outbound email security? Free4 m
- What is Information Security? Free4 m
- Zero Trust Security Model Free3 m
- What is a DNS Lookup? Free4 m
- Understanding the 10 DNS Lookup Limit for SPF Records Free3 m
- SPF Void Lookups Explained Free2 m
- Creating and Optimizing SPF records for your own domain Free4 m
 Video Free2 m
- What is SPF Permerror and How to Fix It Free7 m
- Video Free2 m
- SPF Flattening Free5 m
- SPF Macros Free9 m
- Video Free2 m
- What is SPF Alignment? Free3 m
- How to Set Up Microsoft Office 365 SPF record? Free4 m
- How to Set Up Google Workspace SPF Record? Free2 m
- How to Set Up MailChimp SPF Record? Free3 m
- How to Set Up SendGrid SPF Record? Free2 m
- How to Set Up Salesforce SPF Record? Free3 m
- How to Setup Zoho Mail SPF Record? Free2 m
- What is DKIM Alignment? Free3 m
- DKIM Domain Alignment Failures Free6 m
- How to Set Up DKIM for Microsoft Office 365? Free4 m
- How to Set Up DKIM for Google Workspace? Free3 m
- How to Set Up DKIM for MailChimp? Free4 m
- How to Set Up DKIM for SendGrid? Free3 m
- How to Set Up DKIM for Salesforce? Free3 m
- How to Set Up DKIM for Zoho Mail? Free3 m
- DMARC RFC 9989, 9990 and 9991 Free5 m
- What is DMARC Compliance? Free2 m
- DMARC Compliance Requirements Free2 m
- The Benefits of DMARC Free2 m
- DMARC Configuring Free3 m
- Achieving DMARC Enforcement Free2 m
- DMARC Vs Antispam Solutions Free2 m
- DMARC Identifier Alignment Free2 m
- DMARC sp Tag Exceptions & Uses Free1 m
- Configuring DMARC without DKIM Free3 m
- Configuring DMARC without SPF Free2 m
- DMARC Aggregate Report Views Free3 m
- Video - PowerDMARC Aggregate Reports Free2 m 13 s
- DMARC Forensic Report Views Free2 m
- Video - PowerDMARC Forensic Reports Free0 s
- DMARC Forensic PGP Encryption and Decryption Free2 m
- TLS Report Views Free3 m
- Video - PowerDMARC TLS Reports Free0 s
- PDF/CSV Reports Free2 m
- Video - PowerDMARC PDF/CSV Reports Free1 m 1 s