- One such crucial specification is that your logo image must be in SVG format. Scalable Vector Graphic or SVG is a popular format that drives several elements of modern websites and applications. Different to popular bitmap formats like GIF, JPG, and PNG, the vector graphics are made out of lines and curves which can be easily scaled without loss of detail. SVG is comparatively lighter, loads quickly, and adapts easily to responsive sizing.
- For BIMI implementation the exact dimensions of the logo do not matter as it is uploaded in SVG format makes it easily scalable. However, the image must be square and the aspect ratio must be 1:1.
- The logo must meet the SVG BIMI profile. While SVG standard is very versatile and has a range of versions to choose from, the closest fit to the SVG BIMI specifications is SVG 1.2 Tiny.
How to Prepare the SVG File Correctly?
The most commonly used tool for exporting the right SVG is Adobe Illustrator.
In order to prepare your SVG correctly, all you need to do is :
- In case your logo is image-based, you can use the Trace Image button to convert your image into a graphic.
- SVG for BIMI does not support text objects. In case your logo has any text, it appears in the Control Toolbar as “Type”. To remove text objects, select your text layer and select the “Create Outlines” option from the “Type” menu. The Control Toolbar no longer identifies the text object as “Type” but as a “Group” instead.
- Lastly, you would need to ungroup all groups to make sure exporting the SVG is a smooth process. The simplest way is to press Ctrl+A to select all objects and then click on the “Ungroup” option in the “Object” menu. You may have to repeat this process until all groups in the document are ungrouped.

Exporting SVG file
- In order to meet BIMI SVG specifications, the logo needs to be in square dimensions. To achieve that, you need to create a new file without closing the current one. Make sure the new file is in square dimensions with a 1:1 aspect ratio, and the color mode selected is RGB and not CMYK.
- Navigate to the original file and press Ctrl+A to select all objects. Copy all objects from the original file and paste them into the new file you created in square dimensions.
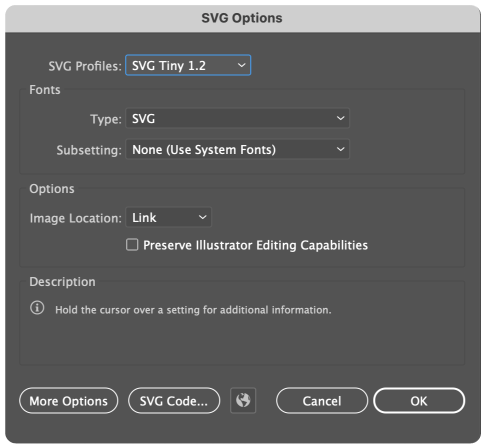
- Click on the “Save” option from the File menu to save the file. In the destination folder make sure the file format is set to SVG and not SVG compressed.
- Notice that an SVG dialogue box opens up. Under “SVG Profiles” in the box, select “SVG Tiny 1.2”. Under the “More Options” button adjustment the “Decimal Places” criteria to 1, 2, or 3 to preserve details, depending on how complex your logo is.
Code Cleanup
- You can use any text editor to manually clean up the code after exporting your SVG file.
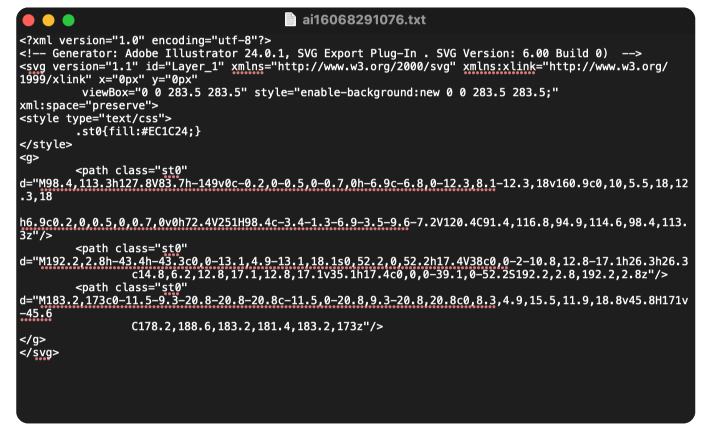
- You can start by removing the highlighted section with the information about the used version of Adobe Illustrator.
- Then find the x=”0px” y=”0px” from the line starting with <svg as seen on the image. The same element also often contains overflow=”visible” attribute that needs to be removed as it is not supported by BIMI SVG standard.
- Then you need to find the baseProfile=”tiny” and replace it with baseProfile=”tiny-ps”.
- Next, you need to add the required <title> tag into your SVG below the <svg…>. The purpose of the title is to provide accessibility so that it reflects your brand.
- Finally, Save the file and use our validator to make sure your SVG validates correctly.