How to Set Up DKIM for Salesforce?
Steps to Setup DKIM for Salesforce
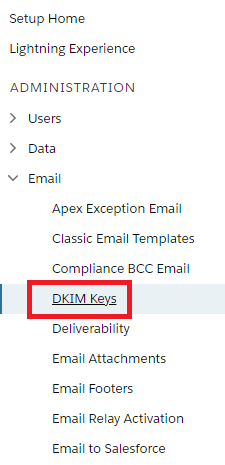
1. Navigate to the Salesforce Setup menu and type in DKIM in the quick find.
2. Click on DKIM Keys.

Then select Create New Key.

3. Now choose your key size, and for the primary DKIM selector enter s1. For your alternative selector enter s2.
4. Enter your domain name, in this case, we have used yourdomain.com.
5. You can choose your domain match according to your preferences. In this case, I have chosen to go with the exact match.
6. Click Save.
It will take some time for Salesforce to generate the 2 CNAME records. Refresh your page, and you will see something like this:

Publishing the DKIM CNAME Records in Your DNS
1. Open your DNS management console
2. Copy the part of your CNAME record before “IN CNAME” and paste it into the first row of your DNS for the specific domain
3. Copy the part of your alternative CNAME record before “IN CNAME” and paste it into the second row of your DNS for the specific domain
4. Copy and paste the part of the CNAME records after “IN CNAME” as shown below:

5. Wait a while for your DNS to process the newly made changes
6. Then click on the “Activate” button on the DKIM record
Standard Email Protocols: SMTP, POP3 & IMAP Free4 m
What is Email Security? Free4 m
Email Security Practices Free4 m
Building an Email Security Compliance Model Free5 m
Corporate Email Security Checklist Free3 m 30 s
What is the difference between Inbound email security and outbound email security? Free4 m
What is Information Security? Free4 m
Zero Trust Security Model Free3 m
What is SPF Alignment? Free3 m
How to Set Up Microsoft Office 365 SPF record? Free4 m
How to Set Up Google Workspace SPF Record? Free2 m
How to Set Up MailChimp SPF Record? Free3 m
How to Set Up SendGrid SPF Record? Free2 m
How to Set Up Salesforce SPF Record? Free3 m
How to Setup Zoho Mail SPF Record? Free2 m
What is DMARC Compliance? Free2 m
The Benefits of DMARC Free2 m
DMARC Configuring Free3 m
Achieving DMARC Enforcement Free2 m
DMARC Vs Antispam Solutions Free2 m
DMARC Identifier Alignment Free2 m
DMARC sp Tag Exceptions & Uses Free1 m
Configuring DMARC without DKIM Free3 m
Configuring DMARC without SPF Free2 m
DMARC Aggregate Report Views Free3 m
Video - PowerDMARC Aggregate Reports Free2 m 13 s
DMARC Forensic Report Views Free2 m
Video - PowerDMARC Forensic Reports Free
DMARC Forensic PGP Encryption and Decryption Free2 m
TLS Report Views Free3 m
Video - PowerDMARC TLS Reports Free
PDF/CSV Reports Free2 m
Video - PowerDMARC PDF/CSV Reports Free1 m 1 s